


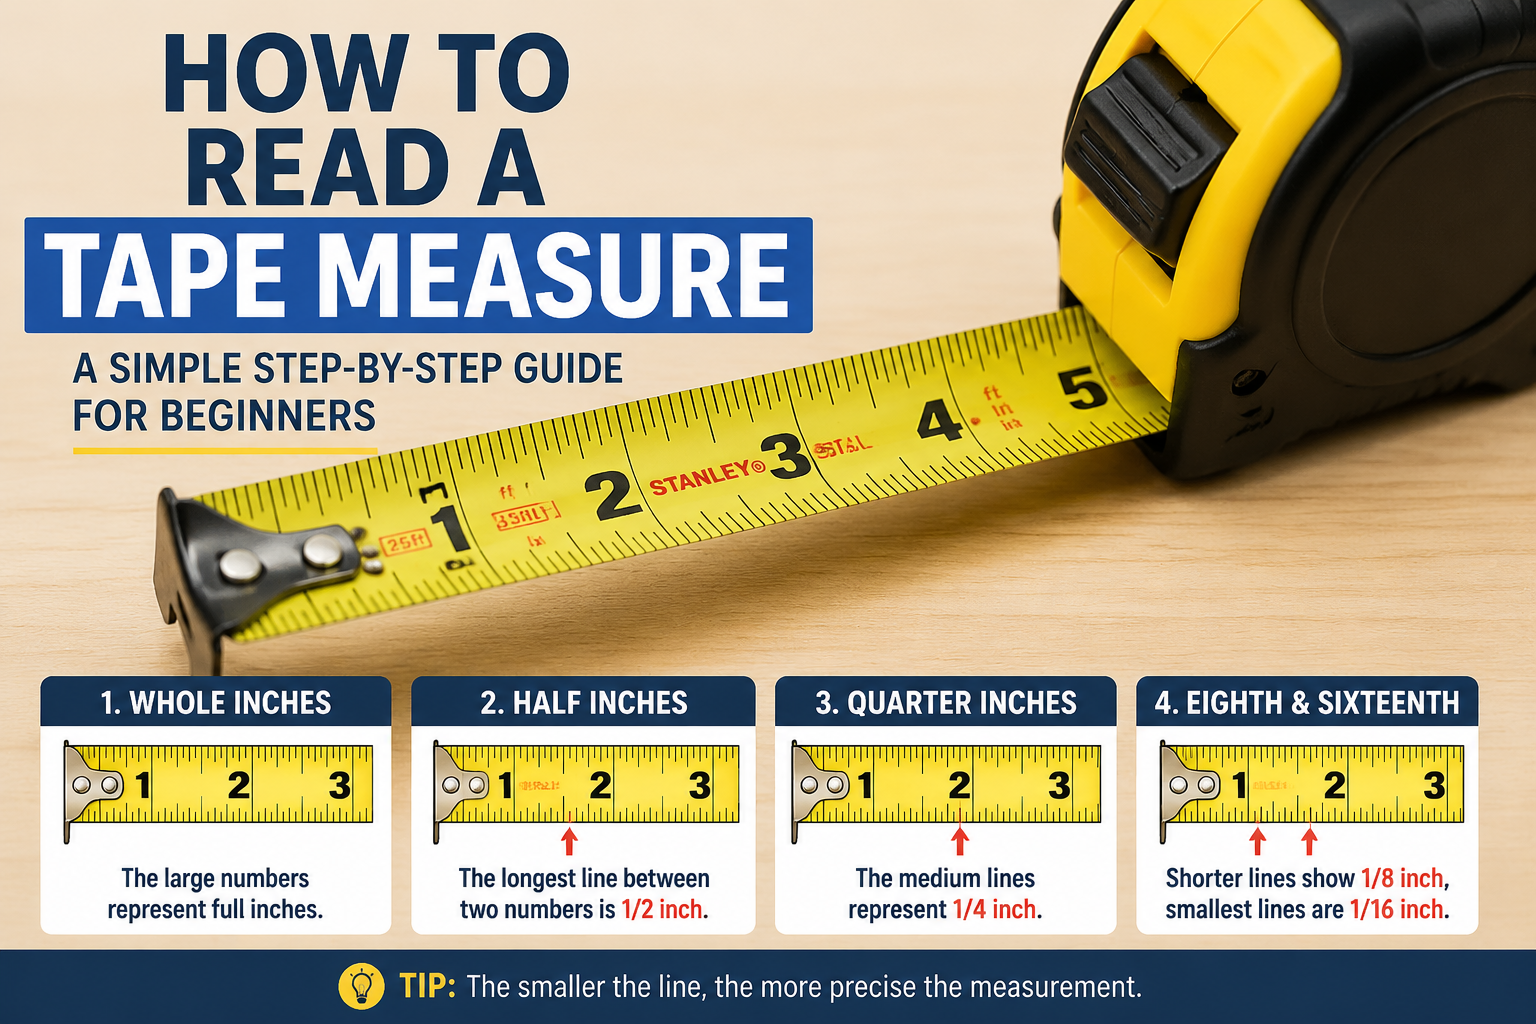
Learning how to read a tape measure is one of those basic skills that instantly makes DIY work, home improvement, and even small repairs much easier. Whether you are measuring furniture, cutting wood, or checking room dimensions, understanding how to read a tape measure correctly saves time and prevents costly mistakes.
This guide breaks everything down in a simple, practical way so you can confidently master how to read a tape measure without confusion.
What Is a Tape Measure and Why It Matters
A tape measure is a flexible ruler used to measure length, width, and height. It usually comes in inches, centimeters, or both.
When people first try how to read a tape measure, they often get confused by the small lines. But once you understand the pattern, it becomes very simple.
A basic truth in construction and DIY is this:
“Accurate measurement is the foundation of every perfect build.”
That’s why learning how to read a tape measure is more important than it looks.
Understanding the Parts of a Tape Measure
Before mastering how to read a tape measure, you need to know its main parts.
1. Blade (Metal Tape)
This is the long, flexible strip with markings on it. It shows inches, feet, or centimeters.
2. Hook (End Tip)
The small metal piece at the end adjusts slightly to ensure accurate inside and outside measurements.
3. Lock Button
Used to hold the tape in place when measuring.
4. Markings (The Most Important Part)
These are the lines that help you understand how to read a tape measure correctly:
- Large numbers = inches or centimeters
- Smaller lines = fractions or millimeters
Understanding these parts makes how to read a tape measure much easier in real situations.
Inches vs Centimeters: What You Should Know
When learning how to read a tape measure, the first thing you’ll notice is different measurement systems.
Inches (Imperial System)
Used mostly in the US and some construction work. One inch is divided into:
- 1/2
- 1/4
- 1/8
- 1/16
Centimeters (Metric System)
Used in most countries. It is simpler because:
- 10 mm = 1 cm
- Clear decimal structure
If you are confused about how to read a tape measure, start with centimeters first, then move to inches.
How to Read Inches on a Tape Measure
Now let’s focus on the core skill: how to read a tape measure in inches.
Each inch is divided into smaller parts:
1. Whole Inches
The big numbers (1, 2, 3…) represent full inches.
Example:
If the tape shows “5”, it means 5 inches.
2. Half Inches (1/2)
The longest line between two numbers.
3. Quarter Inches (1/4)
Slightly smaller lines dividing halves.
4. Eighth and Sixteenth Inches
Very small lines used for precision work.
A simple way to remember how to read a tape measure is:
“The smaller the line, the more precise the measurement.”
So when you see a mark between 2 and 3 inches:
- Halfway = 2 1/2 inches
- Smaller step = 2 1/4 or 2 3/4 inches
Once you practice, how to read a tape measure becomes automatic.
How to Read Centimeters on a Tape Measure
Centimeters are easier when learning how to read a tape measure.
Each centimeter is divided into 10 millimeters.
Example:
- 1 cm = 10 mm
- 2.5 cm = 2 cm + 5 mm
The lines are evenly spaced, making it simple.
When someone is starting out with how to read a tape measure, professionals often recommend using the metric side first.
“Precision becomes simple when the system is logical.”
That’s exactly why centimeters are beginner-friendly in how to read a tape measure.
Step-by-Step: How to Read a Tape Measure Correctly
Let’s break down how to read a tape measure into simple steps.
Step 1: Place the Hook Properly
Start from the edge of the object. The hook ensures accuracy.
Step 2: Extend the Tape Straight
Avoid bending. A straight tape gives correct measurement.
Step 3: Identify Whole Numbers First
Look for the nearest large number before focusing on small lines.
Step 4: Check Small Markings
Now identify fractions or millimeters.
Step 5: Combine the Values
Example:
- 3 inches + 1/4 inch = 3 1/4 inches
That’s the simplest formula for how to read a tape measure correctly.
Real-Life Examples of Using a Tape Measure
Understanding how to read a tape measure becomes easier with real examples.
Example 1: Measuring a Table
You measure a table and get:
- 4 feet + 6 inches
So the table is 4’6”.
Example 2: Cutting Wood
A carpenter needs 12 3/4 inches of wood.
Without knowing how to read a tape measure, mistakes can ruin the project.
Example 3: Home Furniture Setup
You check if a sofa fits in a space:
- Room width = 10 feet
- Sofa width = 8 feet
Now you know it fits perfectly.
Common Mistakes When Reading a Tape Measure
Many beginners struggle with how to read a tape measure because of simple mistakes.
1. Ignoring the Hook Movement
The hook is slightly loose for accuracy. Beginners think it’s broken.
2. Confusing Small Lines
Mixing 1/8 and 1/16 lines is very common.
3. Not Holding Tape Straight
A bent tape changes measurement.
4. Reading from Wrong End
Always start from the hook side.
“Most measurement errors come not from tools, but from technique.”
Avoiding these mistakes improves how to read a tape measure instantly.
Tips to Master How to Read a Tape Measure Fast
Here are practical tips to improve how to read a tape measure quickly:
Practice Daily
Measure random objects around you.
Start with Simple Objects
Books, tables, and doors are perfect.
Use the Metric Side First
It builds confidence faster.
Learn Fractions Gradually
Don’t rush 1/16 inches at the beginning.
Double Check Measurements
Always verify before cutting or drilling.
These habits make how to read a tape measure second nature.
Why Accuracy Matters in Measurement
When you fully understand how to read a tape measure, you reduce waste and errors.
In construction, even a small mistake can lead to:
- Wrong fitting
- Material waste
- Time loss
That’s why professionals value how to read a tape measure as a core skill.
“Measure twice, cut once — accuracy saves everything.”
Advanced Uses of a Tape Measure
Once you master how to read a tape measure, you can use it in advanced tasks:
1. Carpentry
Cutting wood with exact dimensions.
2. Interior Design
Measuring space for furniture layout.
3. Sewing and Tailoring
Getting precise fabric lengths.
4. Construction Work
Checking walls, beams, and floor layouts.
Each of these depends heavily on how to read a tape measure correctly.
Quick Cheat Sheet for How to Read a Tape Measure
Here’s a simple summary of how to read a tape measure:
- Big numbers = inches or cm
- Medium lines = half or quarter inches
- Small lines = 1/8 or 1/16 inches
- Metric side = mm and cm
- Always start from the hook
Keep this in mind whenever you practice how to read a tape measure.
Frequently Asked Questions
Why is how to read a tape measure confusing for beginners?
Because of the small fractional markings and dual measurement systems.
What is the easiest way to learn how to read a tape measure?
Start with centimeters and practice measuring everyday objects.
Do professionals still check measurements manually?
Yes, because even experts rely on accurate how to read a tape measure skills.
Final Thoughts
Learning how to read a tape measure is not complicated once you understand the structure. It is a skill that improves with small, consistent practice.
The more you use it, the more natural how to read a tape measure becomes in daily life. From home projects to professional work, this simple tool plays a powerful role in accuracy and success.
“Every great project begins with a single accurate measurement.”