


Introduction
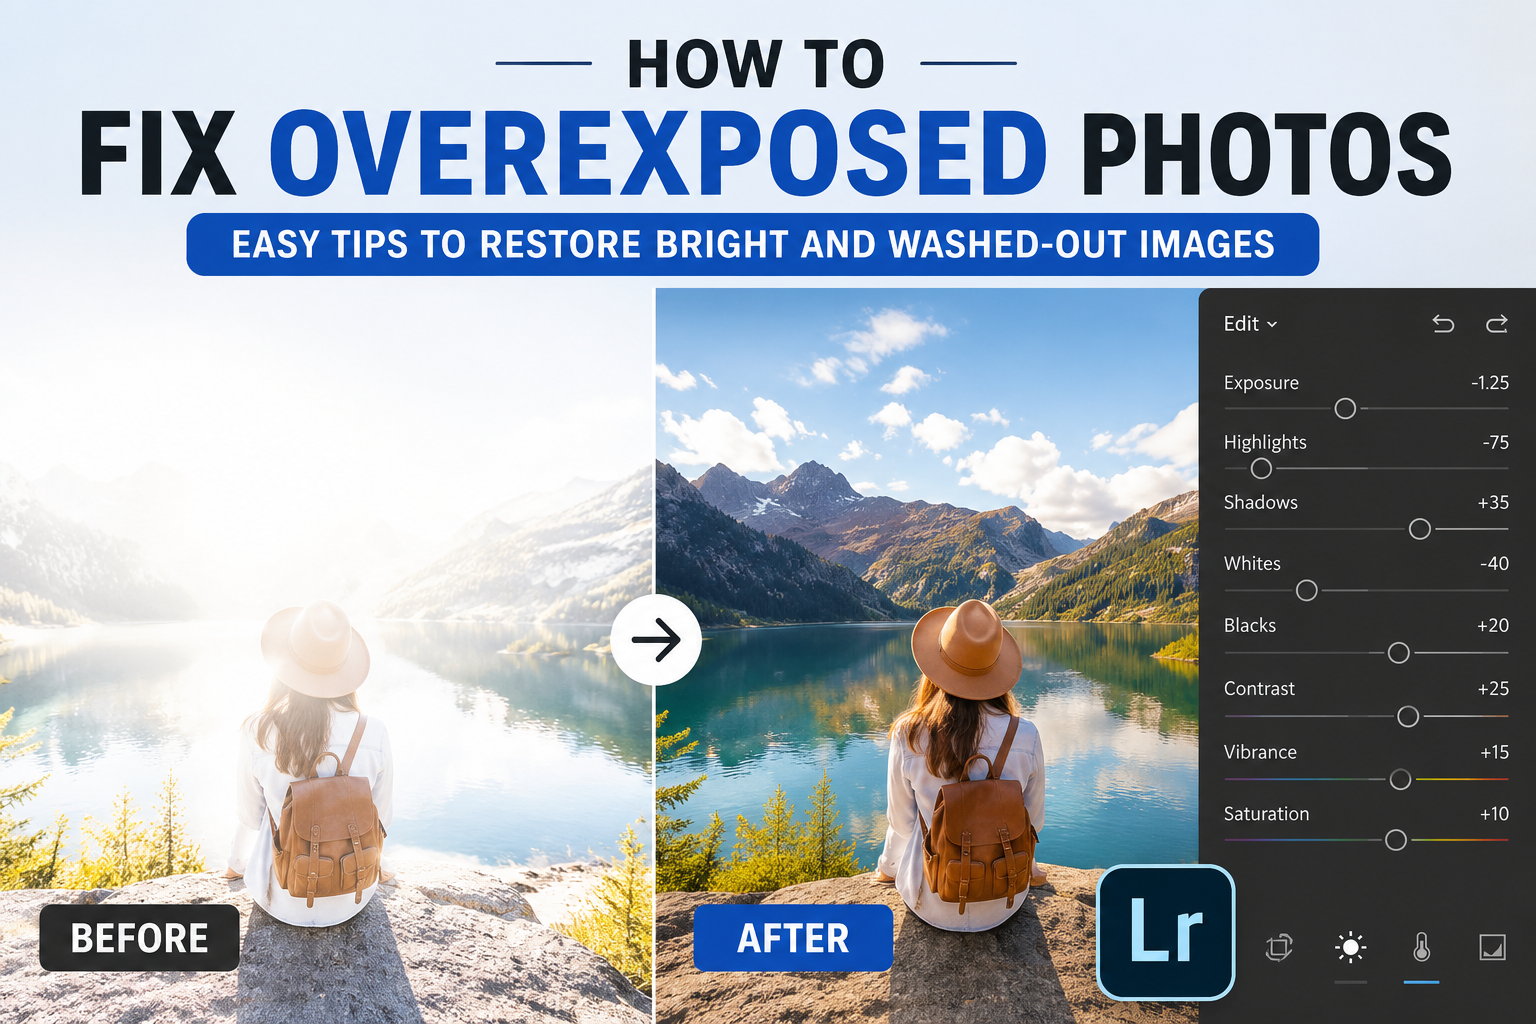
Have you ever taken a photo that looked perfect on your camera screen, only to discover later that it was far too bright? If so, you’re not alone. Learning how to fix overexposed photos is one of the most useful photography and photo-editing skills you can develop.
An overexposed photo happens when too much light enters the camera sensor. The result is a picture with bright areas that lose detail, making the image appear washed out or faded. Fortunately, modern editing tools make it possible to recover many overexposed images.
As photographers often say, “A great photo isn’t always made in the camera—it can also be saved in the editing room.” Understanding how to fix overexposed photos can help rescue valuable memories and improve your overall photography results.
What Is an Overexposed Photo?
An overexposed photo contains areas that are excessively bright due to too much light reaching the camera sensor.
These bright sections often lose texture and detail, especially in highlights such as skies, clouds, white clothing, or reflective surfaces.
Think of it like pouring too much milk into coffee. Eventually, the coffee loses its rich color and becomes overly light. The same thing happens to your photograph when exposure goes beyond the ideal level.
Common signs of overexposure include:
- Washed-out colors
- Bright white spots with no detail
- Low contrast
- Faded appearance
- Loss of texture in highlights
Why Photos Become Overexposed
Understanding the causes can help you prevent the issue in the future while learning how to fix overexposed photos more effectively.
Too Much Natural Light
Shooting in direct sunlight, especially around midday, can easily result in overexposed images.
Bright outdoor environments often trick camera sensors into capturing excessive light.
Incorrect Camera Settings
A slow shutter speed, wide aperture, or high ISO can allow more light into the camera than necessary.
Even small setting mistakes can significantly affect image exposure.
Automatic Camera Errors
While automatic mode is convenient, cameras sometimes misjudge complex lighting situations.
Scenes with snow, beaches, or bright backgrounds frequently cause exposure problems.
Flash Overpowering the Scene
Using a strong flash at close range can make subjects appear overly bright.
This is especially common in indoor portraits and product photography.
Can Overexposed Photos Be Fixed?
The answer depends on how severe the overexposure is.
If some detail remains in the bright areas, editing software can often recover much of the lost information.
However, completely blown-out white areas may be impossible to restore because the camera never captured the original details.
A good rule photographers follow is: “Recovery is possible when information exists; restoration becomes impossible when detail is completely gone.”
Even so, learning how to fix overexposed photos can dramatically improve many images.
How to Fix Overexposed Photos Using Editing Software
Modern photo-editing programs offer several tools that help reduce excessive brightness.
Lower the Exposure Setting
The first adjustment should usually be reducing overall exposure.
Most editing software includes an exposure slider that darkens the image and restores balance.
Start with small adjustments to avoid making the photo look unnaturally dark.
Reduce Highlights
Highlights control the brightest areas of your image.
Lowering highlights often recovers detail in skies, clouds, clothing, and reflective surfaces.
This is one of the most effective techniques when learning how to fix overexposed photos.
Adjust Whites
The whites slider specifically targets bright white tones.
Reducing whites can restore detail without affecting the darker parts of the image.
Small changes often produce significant improvements.
Increase Contrast
Overexposed images usually look flat.
Adding contrast helps separate light and dark areas, creating a more natural and visually appealing result.
Avoid excessive contrast, as it can make photos look harsh.
Using Adobe Lightroom to Fix Overexposed Photos
Adobe Lightroom is one of the most popular tools for exposure correction.
The process is simple and beginner-friendly.
Steps to Follow
- Import your photo.
- Open the Develop module.
- Reduce the Exposure slider.
- Lower Highlights.
- Adjust Whites.
- Increase Contrast slightly.
- Fine-tune Shadows if necessary.
These adjustments often recover surprising amounts of detail from bright images.
How to Fix Overexposed Photos in Photoshop
Photoshop offers advanced editing options for severe exposure issues.
Camera Raw Filter
The Camera Raw Filter provides many of the same controls found in Lightroom.
You can reduce:
- Exposure
- Highlights
- Whites
- Brightness
This method works particularly well for RAW image files.
Adjustment Layers
Adjustment layers allow non-destructive editing.
Popular options include:
- Curves
- Levels
- Brightness and Contrast
These tools give precise control over exposure recovery.
Fixing Overexposed Photos on Mobile Devices
You don’t need expensive software to learn how to fix overexposed photos.
Many smartphone apps include professional-quality editing tools.
Snapseed
Snapseed offers excellent exposure controls.
Use the Tune Image feature to:
- Lower brightness
- Reduce highlights
- Improve contrast
The app is free and easy to use.
Adobe Lightroom Mobile
Lightroom Mobile provides many desktop-level editing features.
Exposure, highlights, shadows, and whites can all be adjusted with simple sliders.
Google Photos
Google Photos includes automatic enhancement tools.
While not as powerful as Lightroom, it can quickly improve slightly overexposed images.
Why RAW Files Are Easier to Fix
RAW files store significantly more image data than JPEG files.
Because they contain additional information, they provide greater flexibility during editing.
Photographers often say, “JPEG captures a picture, but RAW captures possibilities.”
Benefits of RAW files include:
- Better highlight recovery
- More editing flexibility
- Improved color correction
- Greater detail retention
If you’re serious about learning how to fix overexposed photos, shooting in RAW is highly recommended.
Advanced Techniques for Exposure Recovery
Sometimes basic adjustments are not enough.
Advanced editing methods can further improve heavily overexposed images.
Use Local Adjustments
Instead of darkening the entire photo, target only the bright areas.
Adjustment brushes and gradient tools help control exposure in specific regions.
HDR Recovery
If multiple exposures were captured, HDR techniques can combine them into a balanced image.
This method preserves details in both shadows and highlights.
Curves Adjustments
Curves allow precise tonal control.
You can darken specific brightness ranges while preserving other parts of the image.
Professional editors frequently rely on curves for difficult corrections.
How to Prevent Overexposed Photos
Prevention is often easier than correction.
The following practices reduce the risk of overexposure.
Check Your Histogram
A histogram shows the brightness distribution of your image.
If data is heavily pushed to the right side, overexposure may occur.
Use Exposure Compensation
Most cameras allow exposure compensation adjustments.
Reducing exposure slightly can protect highlight details.
Shoot During Better Lighting
Golden hour lighting is softer and easier to manage than harsh midday sunlight.
Early morning and late afternoon often produce better exposure results.
Lower ISO Settings
High ISO values can contribute to exposure issues.
Use the lowest practical ISO whenever possible.
Bracket Your Shots
Exposure bracketing captures multiple versions of the same scene at different brightness levels.
This provides backup options if one image becomes overexposed.
Common Mistakes When Fixing Overexposed Photos
Many beginners overcorrect exposure problems.
Avoid these common mistakes:
- Making the image too dark
- Adding excessive contrast
- Oversaturating colors
- Ignoring white balance
- Applying heavy filters
The goal is a natural-looking image, not simply a darker one.
A successful correction should feel invisible to the viewer.
Real-Life Example
Imagine you’re photographing your family at the beach.
The bright sunlight causes the sand and sky to appear nearly white, while faces lose detail.
Using Lightroom, you lower exposure by one stop, reduce highlights, decrease whites slightly, and add moderate contrast.
Within minutes, cloud details return, skin tones improve, and the image appears balanced again.
This simple workflow demonstrates exactly how to fix overexposed photos without requiring advanced editing skills.
Best Tools for Fixing Overexposed Photos
Here are some popular options:
Professional Software
- Adobe Lightroom
- Adobe Photoshop
- Capture One
Beginner-Friendly Tools
- Snapseed
- Google Photos
- Canva Photo Editor
Free Alternatives
- GIMP
- Darktable
- RawTherapee
Each option provides useful features for learning how to fix overexposed photos effectively.
Conclusion
Knowing how to fix overexposed photos can save images that might otherwise seem unusable. By adjusting exposure, highlights, whites, and contrast, you can often restore detail and create a more balanced photograph.
While not every overexposed image can be fully recovered, modern editing software makes remarkable corrections possible. The best approach is a combination of prevention and smart editing.
As the saying goes, “Every photo tells a story, and exposure correction helps make sure that story is seen clearly.” With practice, you’ll become more confident in both capturing and repairing photographs, ensuring your images look their best every time.